

Kaitlyn & I talk last minute DIY Christmas Decor - Saturday 7:30/7:45 am on Global TV
Follow us on Social Media!
Follow:
Kaitlyn Herbst

It was the night before Christmas....and not even an ornament was to be seen..
Christmas can be a busy time of year for many, and Christmas decor can easily fall to the wayside. When entertaining family and friends this holiday season, you want to ensure your house sparkles! Christmas is just days away and if you haven't gotten around to putting up that Christmas tree, dining table centerpieces, making take-away gifts, thinking about table settings and/or even wrapping those presents - Where do you start and what do you do now?... The countdown is on and we're here to help!
We've put together some easy DIY Christmas decor ideas that you can whip up in no time at all. Do you have kids? Great, get them involved! Some of these ideas are great crafts your kids can help with. So, what are some of the most important items to think about when planning your last minute holiday decor?
1) A Christmas tree - we've given you a few options depending on the time you have
2) Dining table/holiday centerpieces
3) Ornaments & gift wrapping
4) Gifts or take-aways for guests
Helpful Hints:
Most of the supplies used were purchased from the dollar store. If you're trying to limit your spending, I would avoid the big craft stores as they tend to be quite expensive.
Use what you have available. There are so many different types of greenery, so don't feel pressured to use what we've used.
There are no rules - Just get creative and most importantly, have fun!

Mini Christmas Tree Ornament
What you'll need:
- wooden skewers
- paper straws
- glue gun
- scissors
- twine
- greenery or ribbon for accent
Directions:
Using your scissors cut your paper straws and skewers to length. Glue gun your paper straws and skewer to your main vertical skewer alternating skewer and straw. Tie a bow, fasten a string to hang your ornament, and accent with a ribbon or piece of greenery. Voila! Easy as that!
2 Minute Boxwood Holiday Tree
What you'll need:
- small log of any kind - we've used last years trimmings from our backyard fig tree
- greenery of any kind - you can use anything you have, even rosemary!
- compound mitre saw
- glue gun
- flat edged screwdriver
Directions:
This one is a little trickier if you don't know how to use or have power tools... but maybe your great uncle Jack might.. hmm...
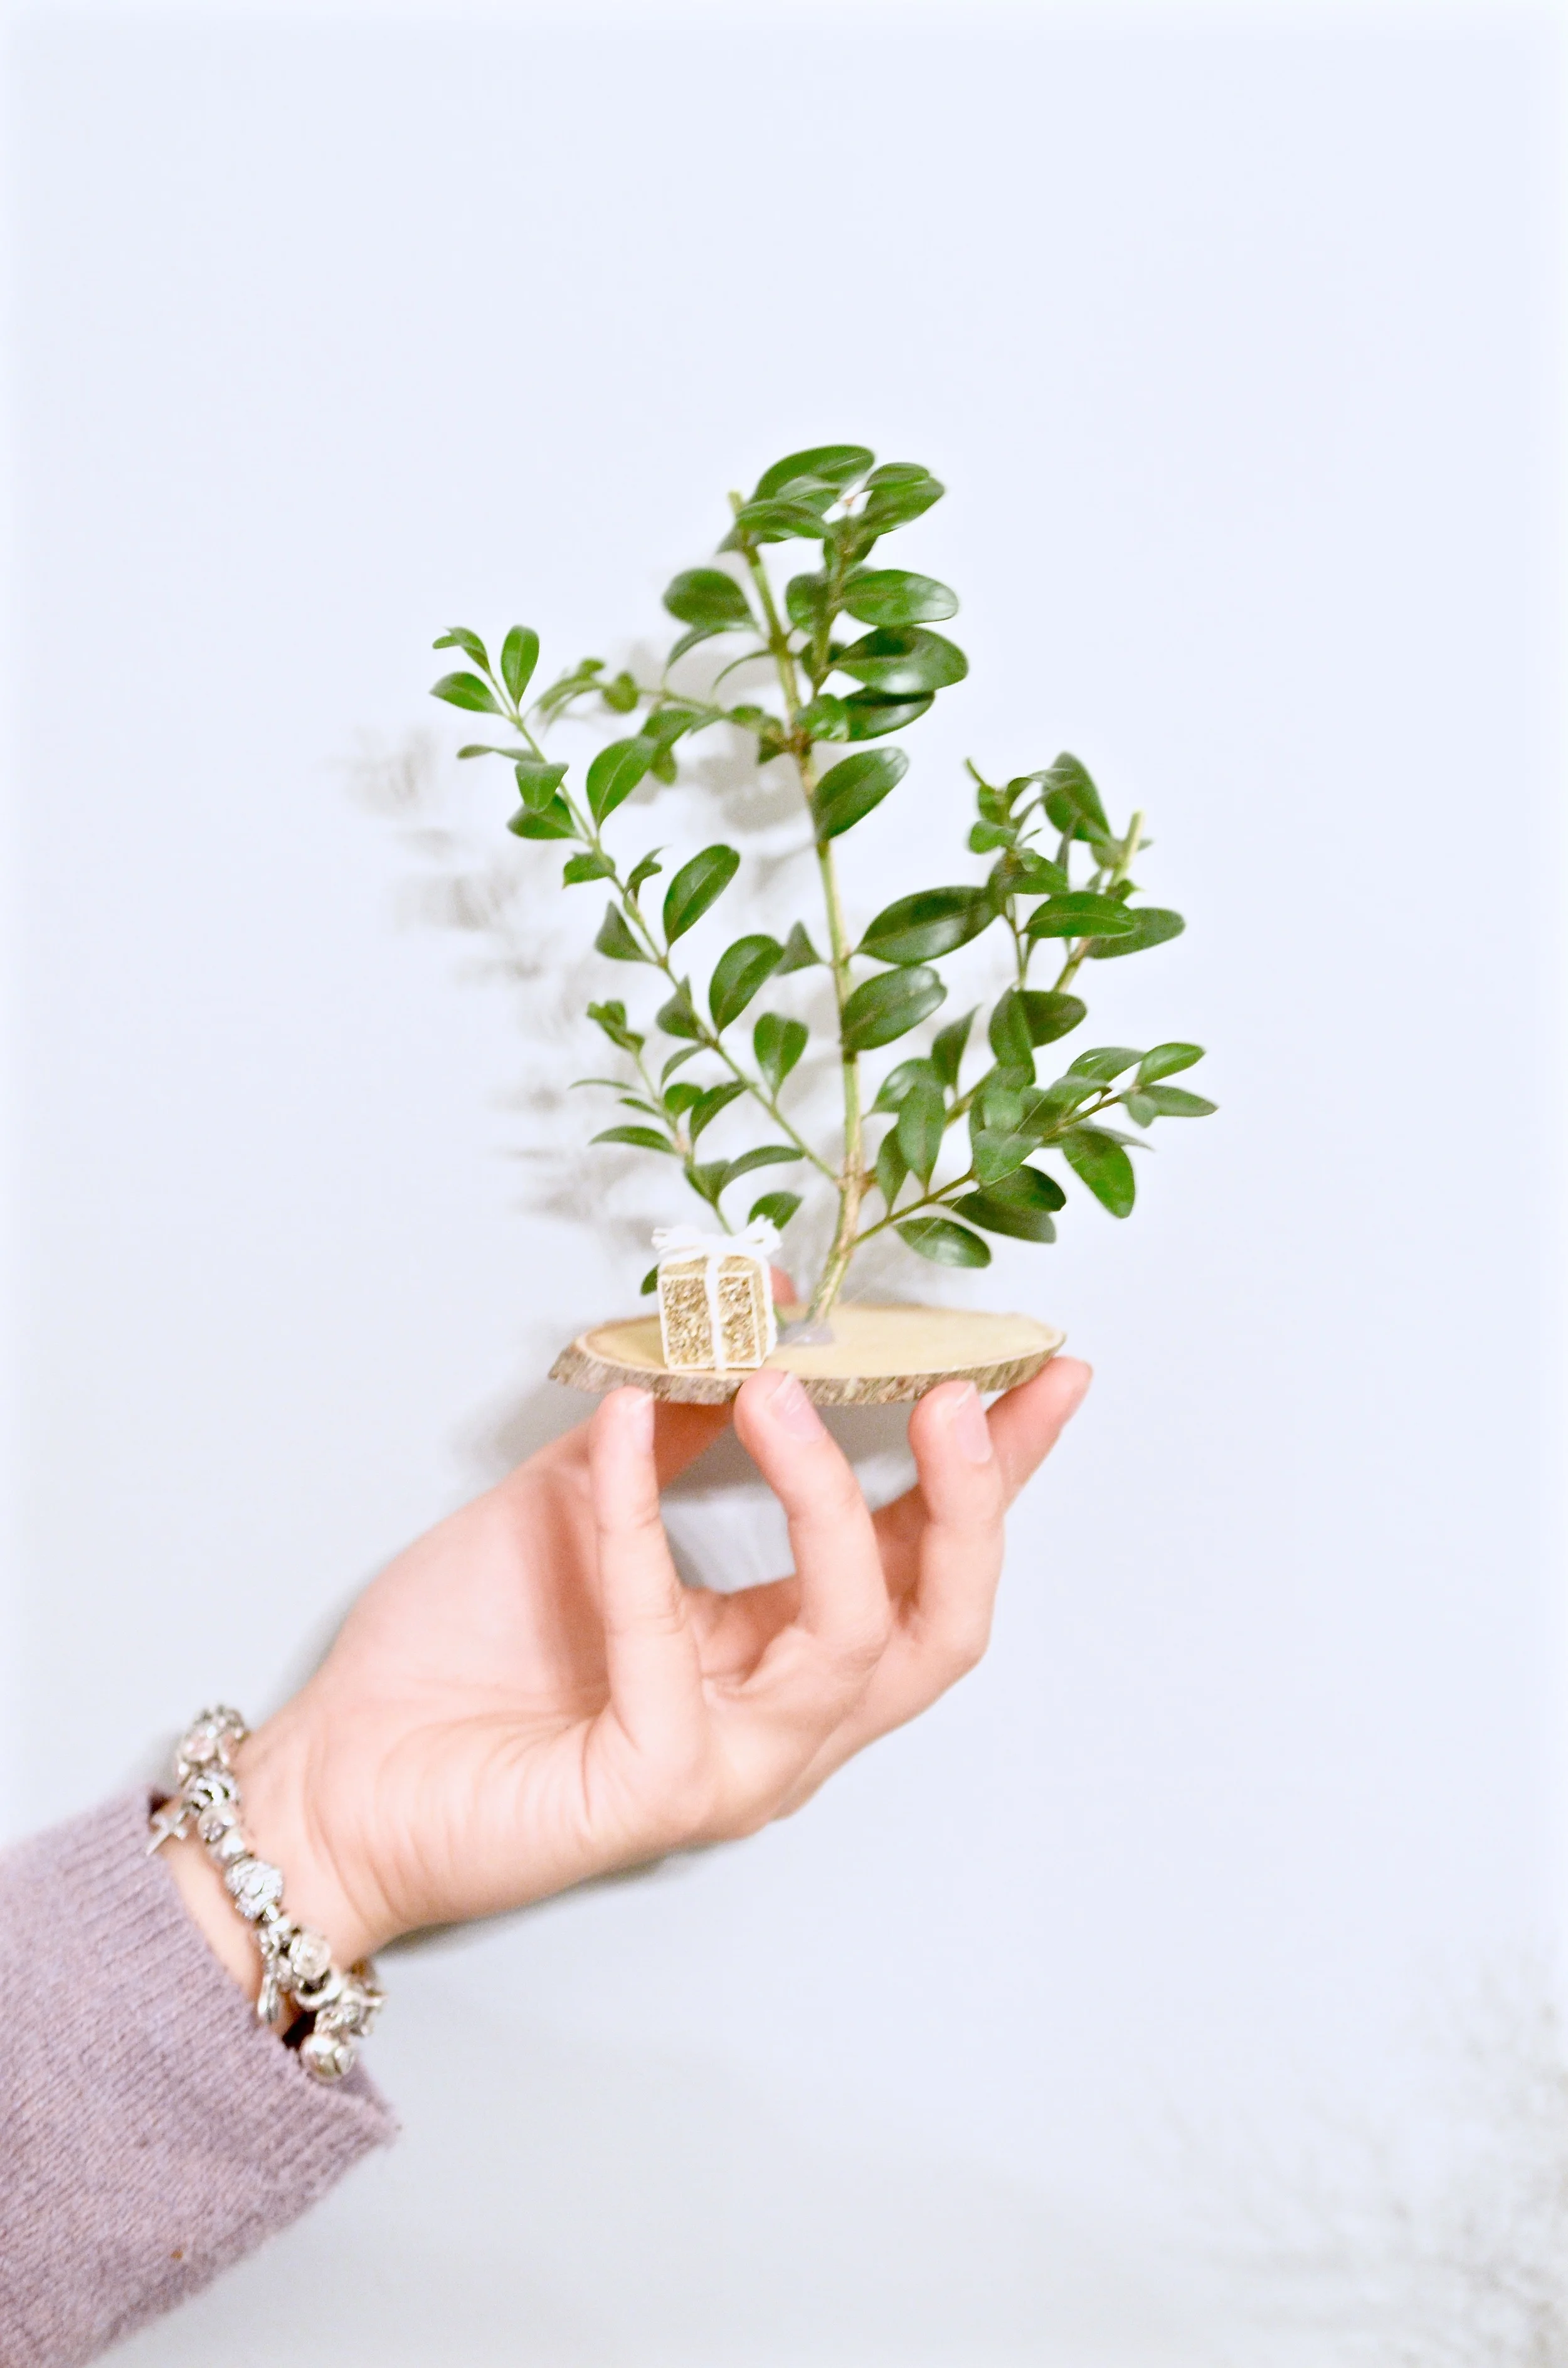
Using a compound mitre saw, we've taken a small log and sliced them on a 30 - 45 degree angle. Make sure to cut extras for your DIY coaster set (see below). Once you have your rounds cut, you'll use your flat head screw driver make a small hole in the centre of your round. It doesn't have to be very deep, but just deep enough to slightly support your branch. Get your glue gun ready, place your branch in the hole and glue. Hold until dry & your done! You can make these is various heights and sizes. I always recommend making 3 different sizes and grouping them together.
These also are a great alternative to a holiday table centerpiece.

Mini Boxwood Terrarium
What you'll need:
- paper straws
- twine
- Greenery (we've used boxwood)
- moss
- florists wire
Directions:
String your twine through the paper straws. The easiest way to start off is by making a triangle with 3 straws and then fill in the missing triangles and join together. Once you have you your terrarium constructed, you can either wrap the straws with greenery or place moss in the bottom and place your greens inside. Use florist wire to fasten your greenery. You can hang these over your dining table or use them as ornaments on your holiday tree. (see our branch tree below)

Modern Minimalist Christmas Tree
Materials needed:
- Wooden skewers - Found at most supermarkets
- Command strips
- Florist wire
- Glue Gun
- Scissors
- Ribbon of choice
- Greenery - We've used a combination of boxwood and cedar branches. If you can't find these in your backyard, ask friends and family for yard clippings.
Directions:
Using your wooden skewers - visualize the bottom of the tree and determine the width. With our tree, we used 5 full skewers on the bottom row, and deducted one on each level until we came to the third row. On the third row you'll use half, second - use 1/3 or a full skewer and the top will be 1/4. You can always make adjustments to the size when attaching your greenery.
Glue gun all of your skewer lengths together by overlapping them slightly, then press and hold until the glue is dry. Now it's timer to attach your greenery. Using your florist wire, securely fasten your greenery by wiring your branches around your skewer. We've alternated the greenery in our tree - one with boxwood and the other with cedar branches. Continue until all branches are completed.
Now fasten to the wall with your command strips. Make sure to space them out evenly, but gradually getting smaller as you reach the top. Tie a small bow with ribbon and place above of your tree.

Paint Chip Holiday Wreath
What you'll need:
- Paint chips or Ombre construction paper
- Scissors
- foam core
- Glue gun
Directions:
Start off by cutting out a wreath shape from your foam core. You can make any size you wish. We've even made 5'-0" ones in the past! Using your Scissors, cut out a leaf shape from your paint chips or construction paper. Use that one as a template for the rest. Depending on the size of wreath you make, the number of leaf shapes may vary. To give your wreath an ombre look, make sure to organize your paint chips or paper from darkest to lightest. Take your leaves and slightly crease them in half lengthwise to give you a folded leaf shape.
Using your glue gun, attach them in rows onto your foam core. Press and hold until dry.
Tip: Don't burn your fingers! We used the back of a spoon to press the leaves to the board instead of your fingers.
Hang & Enjoy ! When in doubt about how to hang - use command strips!

Boxwood Chair Boutonnieres
What you'll need:
- Boxwood
- Ribbon
- Small ornaments
- Florist wire
- command strips
Directions:
Bunch/gather a few branches of boxwood together and fasten with florist wire. Wire in your ribbon for hanging and your small ornament. Attach to the back of your dining chairs. Done & Done!

Dress Up Your Gifts!
We've used the glue gun to fasten these lovely cedar branches to our gift packages. You can use craft paper to wrap - even good old newspaper does the trick. Just remember to dress it up with a stylish hand-tied bow and some greens.
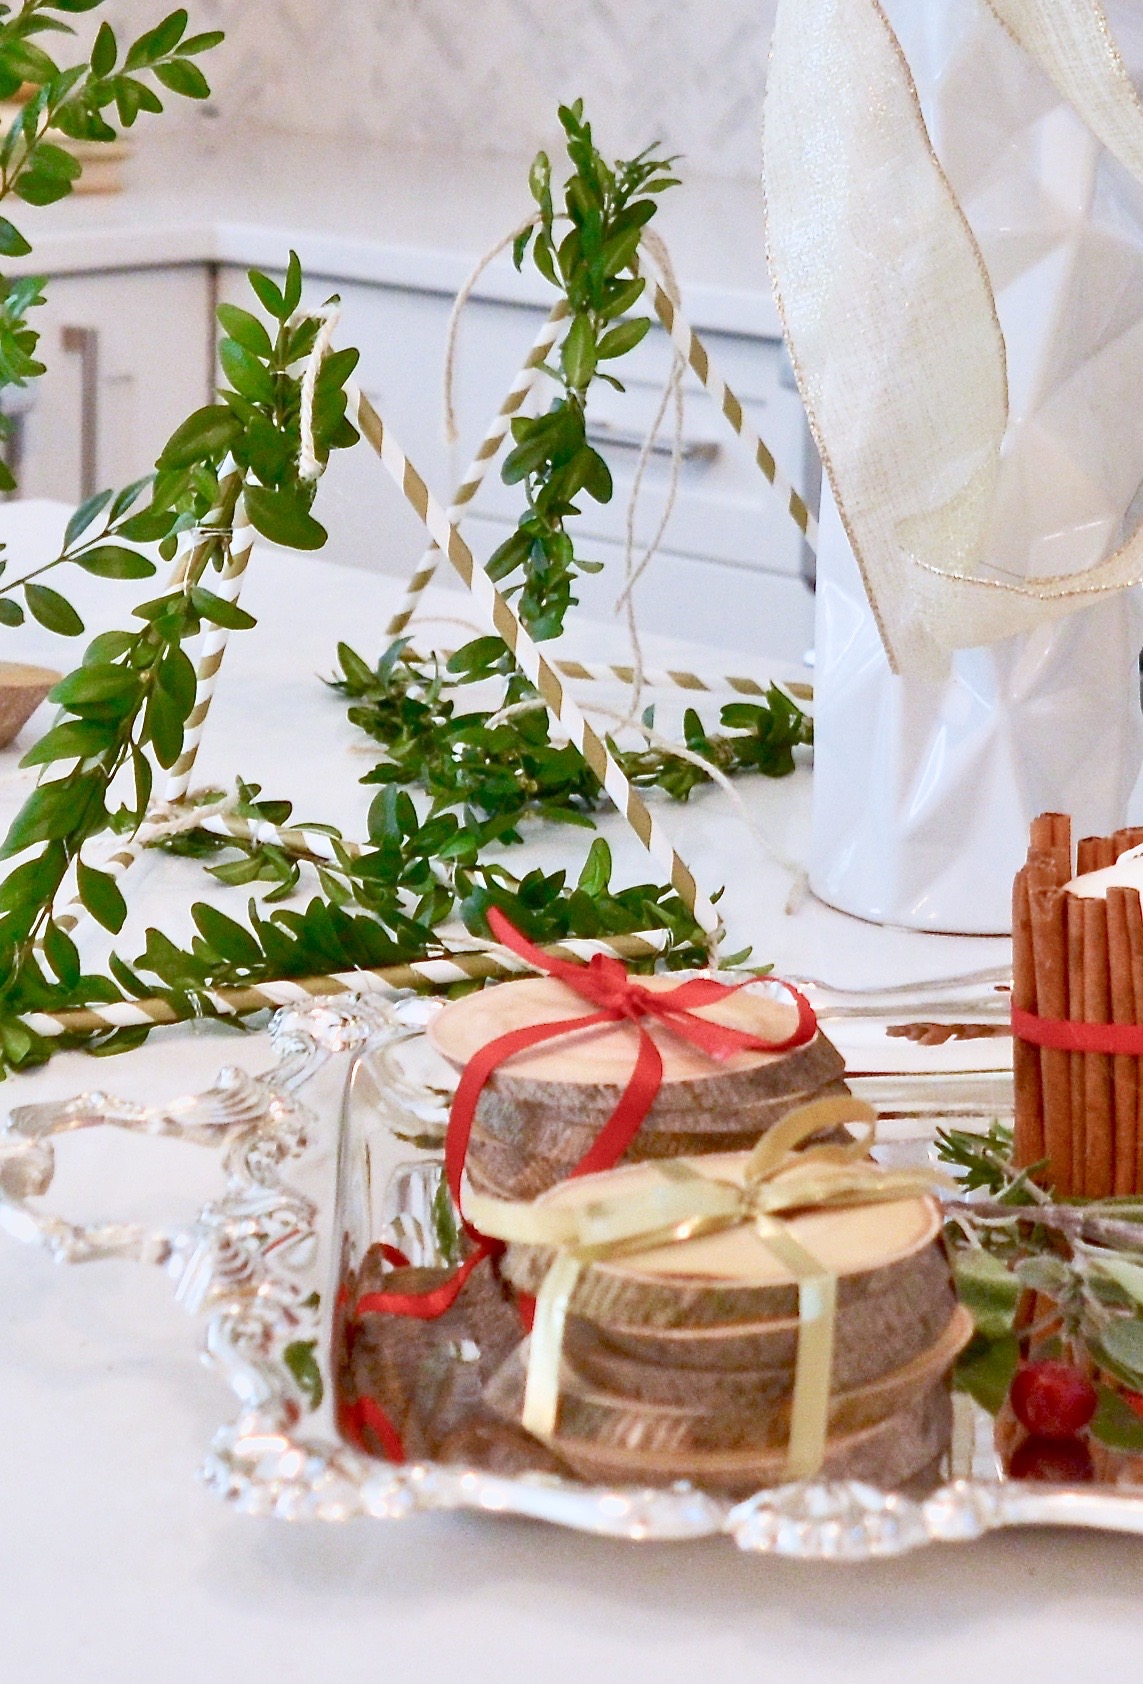
DIY Wood Coaster Set
What you'll need:
- Small log (we used fig)
- Compound mitre saw
- Ribbon
Directions:
On your compound mitre saw cut your log on a 30 - 45 degree angle. Stack rounds and tie with a bow.
Optional:
If you find you have some additional time to spare, these rounds can be stencilled and clear coated with a wood varnish. We just left ours au natural.
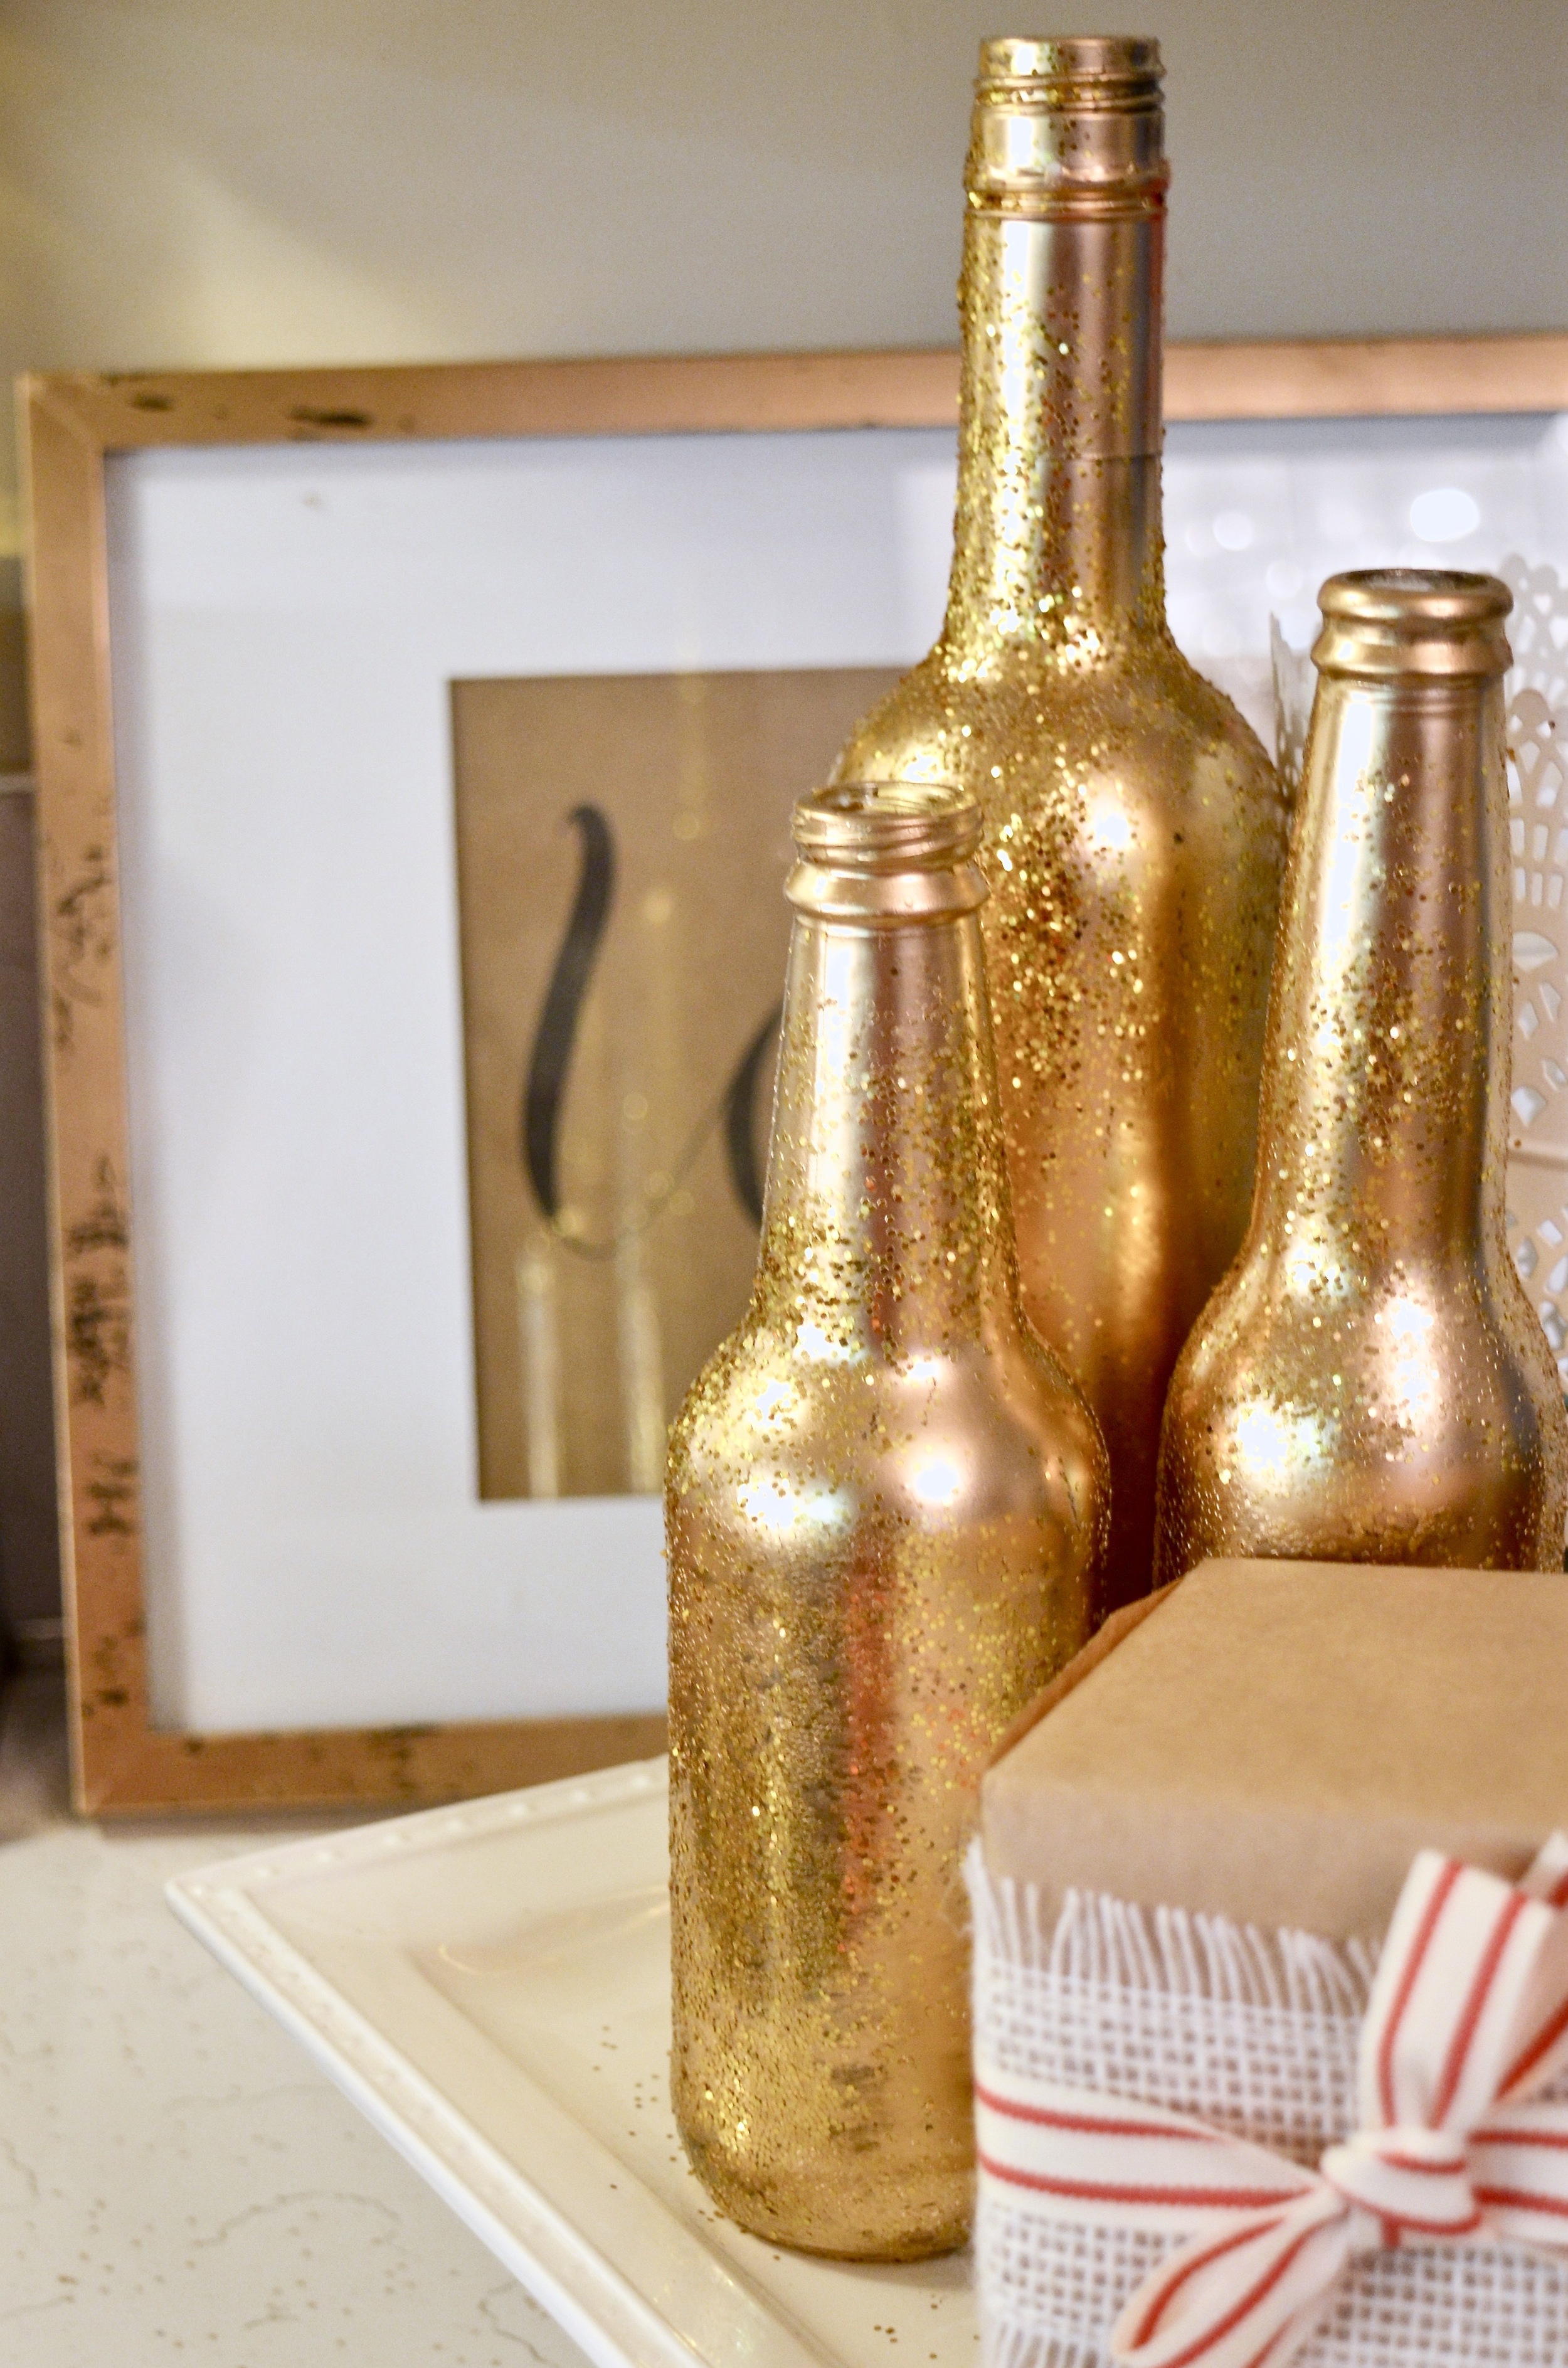
Centerpiece Gold Glitter Bottles
What you'll need:
- Liquor bottles of choice (we used a combination - beer, wine and cider bottles to play with different heights).
- Gold spray paint (Any colour option)
- Glitter
Directions:
If you don't have any bottles lying around, this is the perfect opportunity to make a trip to the liquor store.... Just Kidding! Please craft responsibly.
Make sure you set up your glitter/ spray station outside. This is definitely something you don't and shouldn't do inside your house.
On a plastic drop sheet or cardboard, spray your bottle with your desired paint and immediately sprinkle with matching sparkles. Once glitter-ized, I brought my bottles inside to dry. The bottles won't dry in the cold damp weather we have here.
Optional:
How about teal coloured bottles? Might be worth a try!

Boxwood Wreath & Sage Wrapped Candles
What you'll need:
- Boxwood
- Styrofoam wreath ring (cheapest at the dollar store)
- Florist wire
Directions:
Using your styrofoam wreath ring, stick in the ends your boxwood branches and secure with florist wire. You will need to attach a few layers of branches with a combination of smaller and larger pieces. Once you're happy with the fullness of your wreath, loosely wire down your branches to give it a more tailored look.
What you'll need:
- Candles (assorted heights) We used ikea candles
- ribbon
- twine
- burlap
- sage
Directions:
Cut a piece of twine long enough to overlap and tie around the candle. Lay your sprigs of sage evenly on top of your twine and place candle on one end of the sage. Hold one end of your twine securely against the candle and roll the candle until you can securely tie your twine around the candle. Now dress your candle with a fancy ribbon.

Branch Tree & Paper Glitter Cones
This one is pretty self explanatory! Go into your back yard and chop something down. If you don't have a backyard, again, ask friends and/or neighbours - please don't steal people! You can get pretty creative with these trees... We've kept ours au natural, but you can cover them in lights, dust them in snow, heck - paint them purple! (See our purple tree here)
We've secured ours to the wall with fishing line and.... you guessed it... Command strips!
Glitter Cones:
You can either make your own glitter paper or buy pre-glittered. We suggest you use a paper with a little weight to it. We've used a combination or pre- glittered and un-glittered paper. Take your paper and roll into a cone shape, and trim. Once you have your desired size fasten with a glue gun or tape. Glitter away!
The easiest way to attach your glitter is to apply modge-podge by brush to the desired area.

DIY Nail Polish Mugs
Easy as one, two, three...
What you'll need:
- a disposable plastic container (We used a salad container)
- water
- nail polish - colour of choice
- wooden skewers
- plain white coffee cups
- Nail polish remover - If you make a mistake. (yup - it comes right off)
Directions:
Fill your disposable container with water. Make sure its deep enough to submerge your mug. Spill a few splashes of nail polish into the water, and immediately dunk your mug into the polish water. You can control how you want your mug to look based on how your tilt your cup. Pull your mug almost all the way out of the water, and clean around the base of your mug with the kitchen skewer. Pull out, and place upside down to dry.
Note:
If you're making multiple cups, prior to making your next mug - take your skewer and skim off the polish residue from the top of the water. Re-apply nail polish and go!
*These cups are not dishwasher and/or microwave safe*
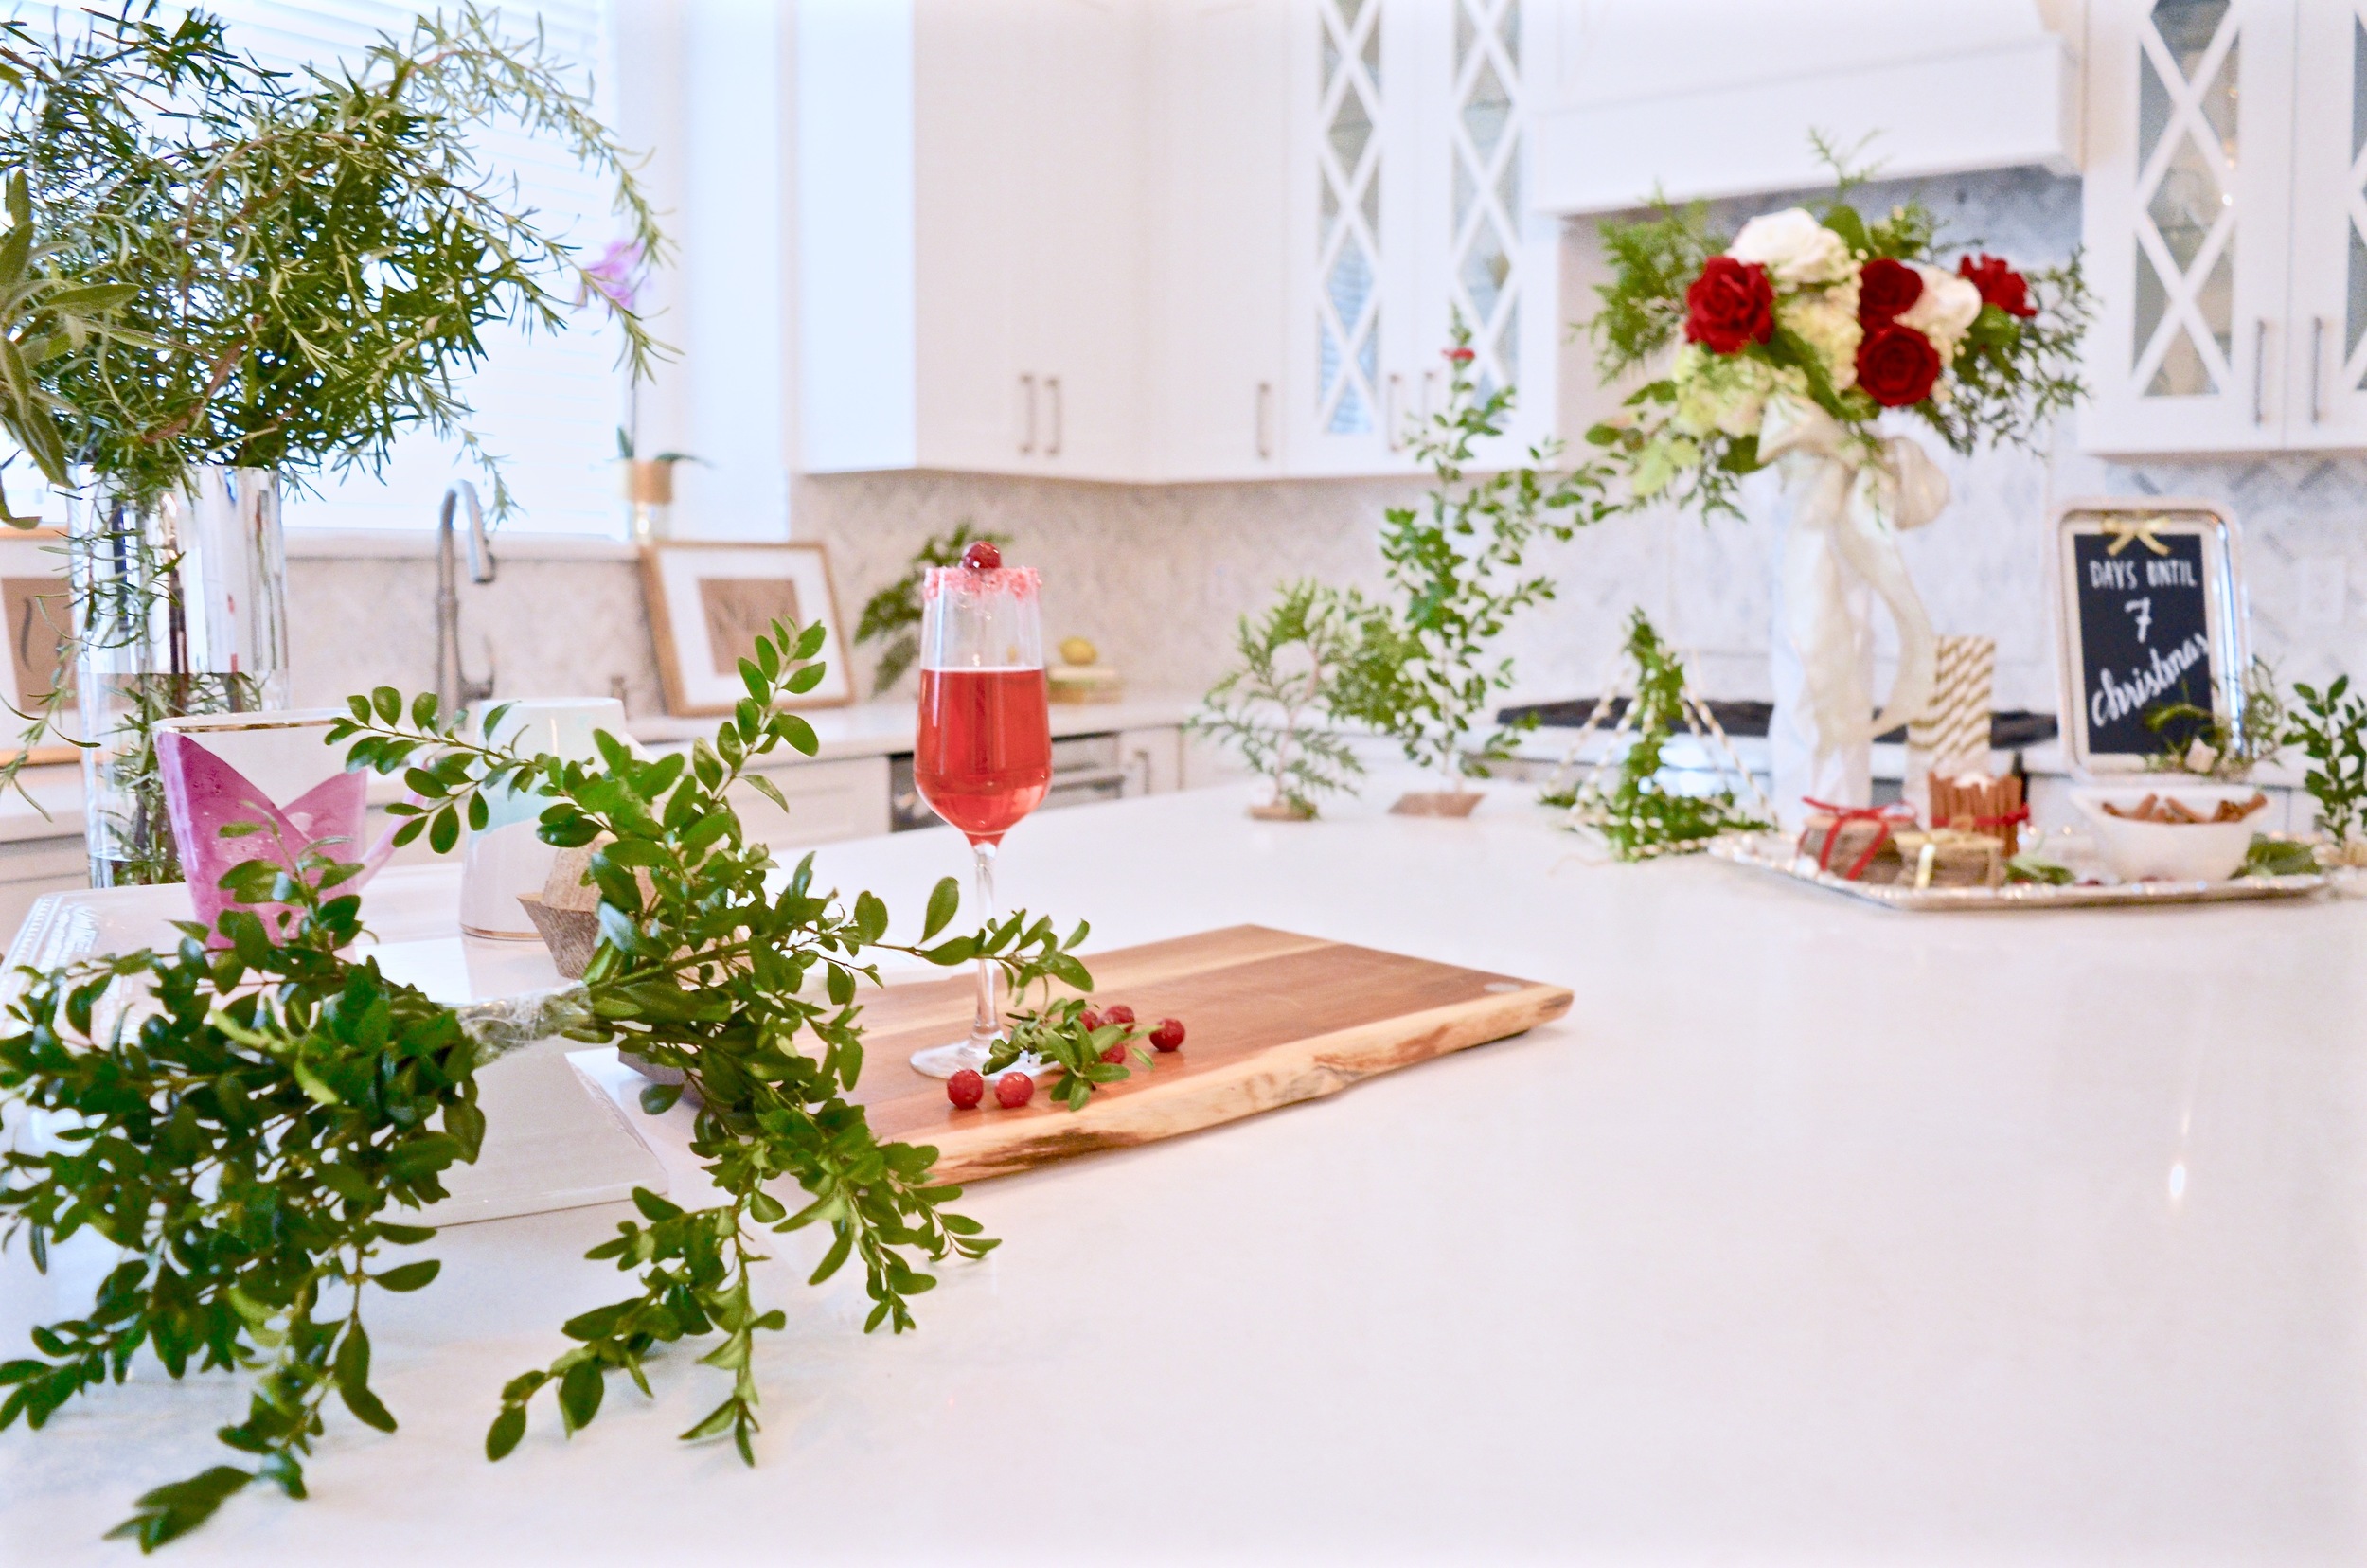
Just a few more shots of our client's gorgeous kitchen!

Festive DIY Frames & Cedar Mini Trees

If you have some extra time to spare, you can even craft up DIY Ornaments for your tree!

DIY Christmas Ornaments
What you'll need:
- feathers
- glue gun
- styrofoam balls
- dollar store pears
- glitter
- modge podge
- twine

Dollar Store Glitter Pears
Directions:
Modge podge your pear with a paint brush and evenly sprinkle with glitter. Tie twine or string around stem to hang, and add a stylish bow. For best results hang to dry.

Feather Ornaments
Directions:
Using your glue gun, start attaching feathers from the bottom of your styrofoam ball. Press and hold until dry. Continue to work your way up to the top of the ball, and fill in bare spots if needed.
Well, that's all folks! If you still have trouble, check out Pinterest for some other great holiday ideas. We've attached a link to our DIY Christmas board.
From all of us here at Accentrix Design, we wish every one of you a very Merry Christmas & happy New Year!
